How to Make a Map Book in ArcMap 10.4
WET contracted with a Montana county to assist them with 911 data collection and mapping. Recently, the county’s map book needed an update, as their current map book was produced using an extension that is no longer compatible with the latest version of ArcMap. WET developed a solution to use data driven pages (which is included with ArcMap) to produce a similar project without having to purchase an extension to ArcMap. We use data driven pages for many different projects in our organization, and ESRI’s online help is a great reference for getting to know how to use the data driven page tools in ArcMap. You can learn more about building map books with ArcGIS (here).
Here are the basics of making a map book with ArcMap
- Create a new base map with all the layers required for your map book.
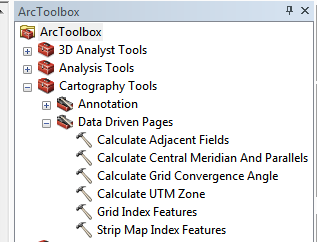
- Choose a suitable layer to use as an index (we used townships for our map book), or use ArcMap’s Data Driven Pages tools from ArcToolbox to build your index.
- There are two options in the toolbox to have ArcMap build an index layer for you:
- Grid Index Features (builds a polygon index based on an area)
- Strip Map Index Features (builds a polygon index based on a linear feature)
- Once your index is created, use the data driven pages setup button and the data driven pages toolbar to enable data driven pages, define your index layer, name field, sort field, and optional rotation, spatial reference, and page number fields. Also, use the extent tab to choose your margin and scale.
- Now in your layout view, use the Insert > Dynamic Text > to insert Data Driven page attributes into your layout.
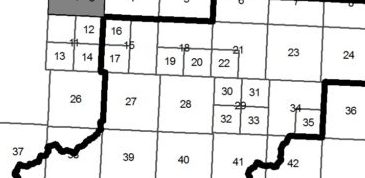
As mentioned earlier, we used section polygons for our index but the issue we had with this approach is that some areas had significantly more detail than others so it was necessary to divide the township polygons into sections to accommodate more details into the map. Some sections of the county have sparse population where it was sufficient to show the whole township for each page, but other areas needed to be split into 2 or 4 sections to accommodate additional details. Others have used parcel fabric tools to split the polygons into smaller sections, but the problem this option is that parcel fabric is not included in ArcMap basic. After some additional research, we discovered a python script for creating a fishnet that appeared to be just what was needed. After some testing and tweaking of the python script, we were able to divide by polygons! Here is a copy of the script:
from math import radians,sin,cos
from arcpy import env
env.overwriteOutput = True
inFC=arcpy.GetParameterAsText(0)
outFolder=arcpy.GetParameterAsText(1)
rectangle=r’in_memory\rectangle’
tempf=r’c:\junk\many.shp’
def showPyMessage():
arcpy.AddMessage(str(time.ctime()) + ” – ” + message)
def ShapeMake(pGon,angle):
ar=arcpy.Array()
a=radians(angle)
part=pGon.getPart(0)
for p in part:
x,y=p.X,p.Y
xN=cos(a)*x+sin(a)*y
yN=-sin(a)*x+cos(a)*y
pN=arcpy.Point(p.X,p.Y)
ar.add(pN)
pgonRotated=arcpy.Polygon(ar)
return pgonRotatedtry:
arcpy.MinimumBoundingGeometry_management(inFC,rectangle,
“RECTANGLE_BY_WIDTH”, “NONE”, “”, “MBG_FIELDS”)
m,n=0,0
with arcpy.da.SearchCursor(rectangle, (“SHAPE@”,”MBG_Orientation”)) as rows:
for row in rows:
shp,angle = row
onside=ShapeMake(shp,-angle)
extent=onside.extent
origPoint=’%s %s’ %(extent.XMin,extent.YMin)
yPoint=’%s %s’ %(extent.XMin,extent.YMax)
endPoint=’%s %s’ %(extent.XMax,extent.YMax)
arcpy.CreateFishnet_management(tempf, origPoint,yPoint,
“0”, “0”, 5, 5,endPoint,
“NO_LABELS”, “”, “POLYGON”)
arcpy.AddField_management(tempf, “Rotation”, “DOUBLE”)
arcpy.AddField_management(tempf, “Label”, “Text”, 25)
arcpy.AddField_management(tempf, “Grid”, “Text”, 5)
m+=1
with arcpy.da.UpdateCursor(tempf, [“SHAPE@”,”Rotation”,”Label”,”Grid”]) as rows:
for row in rows:
shp = row[0]
rollBack=ShapeMake(shp,angle)
row[0]=rollBack
row[1]=angle
row[2]=str(m)
m+=1
row[3]=str(n)
rows.updateRow(row)
n+=1
m=1
arcpy.CopyFeatures_management(tempf, ‘%s%sfnet_%s’%(outFolder,os.sep,str(n).zfill(4)))
except:
message = “\n*** PYTHON ERRORS *** “; showPyMessage()
message = “Python Traceback Info: ” + traceback.format_tb(sys.exc_info()[2])[0]; showPyMessage()
message = “Python Error Info: ” + str(sys.exc_type)+ “: ” + str(sys.exc_value) + “\n”; showPyMessage()
This script is designed to run with a toolbox in ArcMap. To get it to work for you, simply create a toolbox, edit the variables in the script and run! Here is what our final output looks like.

Now on to printing map books!
To learn more about WET’s 911 mapping capabilities and other GIS services, call Jeff LeProwse at (406) 782-5220 or visit our website at www.waterenvtech.com/services/gis-consulting.